TensorFlow の ObjectDetection API を Fine Tuning する
TensorFlow には、Object Detection を行うためのコードが用意されています。
今回は、TensorFlow 1.8.0 でObject Detection を行ってみました。
実行した環境は以下の通り。
Ubuntu 16.04 に Mac Book Pro から ssh で接続
nvidia-docker: 18.03.1-ce
CUDA: 9
cudnn: 7
tensorflow-gpu: 1.8.0
参考にしたもの
自分は、以下の動画を見ながらどのように行えばよいかを学びました。
非常に丁寧に説明されているので、おすすめです。
ただ、問題は解説がWindows 向けにされていること。
なので、今回は Ubuntu でどのようにやればよいかを書いていきたいと思います。
準備
実行するソースコードの準備
上記の環境の任意のディレクトリに、 github.com をclone します。
cd /path/to/dir
git clone https://github.com/tensorflow/models
また、先程の動画の作者の方が作られたレポジトリがあるので、そのコードをclone します。
git clone https://github.com/EdjeElectronics/TensorFlow-Object-Detection-API-Tutorial-Train-Multiple-Objects-Windows-10.git
その後、TensorFlow-Object-Detection-API-Tutorial-Train-Multiple-Objects-Windows-10 ディレクトリの中身を
models/research/object_detection にコピーします。
rm -r models/research/object_detection/doc
rm -r models/research/object_detection/images
rm -r models/research/object_detection/inference_graph
rm -r models/research/object_detection/training
cp TensorFlow-Object-Detection-API-Tutorial-Train-Multiple-Objects-Windows-10/* models/research/object_detection/
環境の整備
protobuf の準備をします。
apt-get install protobuf-compiler
を行い。 protobuf をインストールした後、
cd path/to/dir
git clone https://github.com/cocodataset/cocoapi.git
cd cocoapi/PythonAPI
make
cp -r pycocotools ../../models/research/
cd models/research
protoc object_detection/protos/*.proto --python_out=.
というコマンドを実行します。
これらのコマンドは、
models/installation.md at master · tensorflow/models · GitHub
に載っています。
ラベルの準備
次に、ラベルの準備を行います。
自分は、Mac の App Store から¥240 で購入できます。
とても使い勝手がいいのでおすすめです!
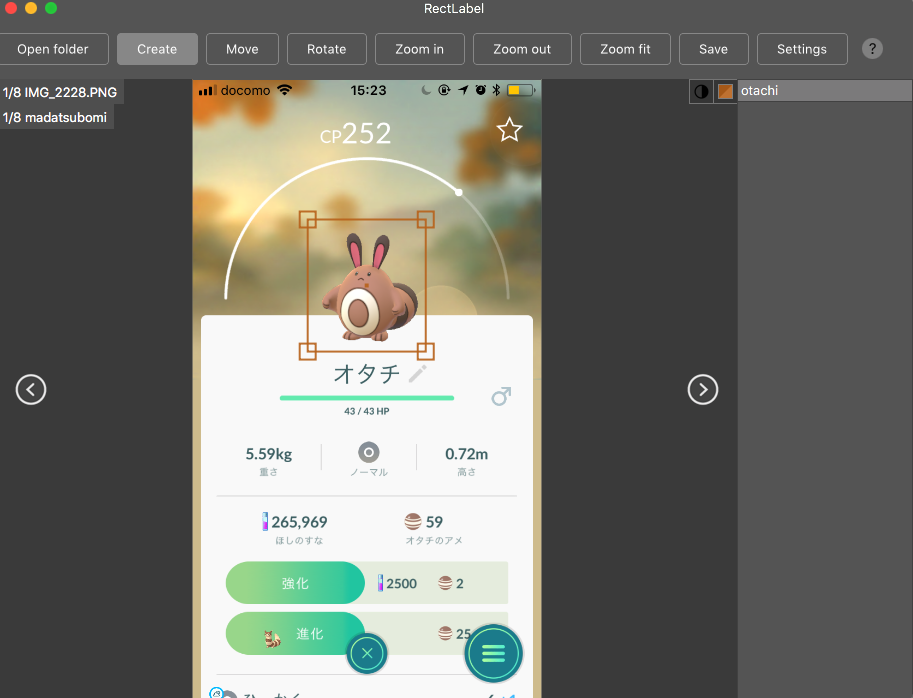
RectLabel を使ってラベルをつけていきます。
他にも labelbox.com というツールが有るようで、動画ではこちらを使っています。
こんな感じでラベルをつけていきます。

ラベルの作成が終わったら、
Ubuntu 上、 /path/to/dir/models/research/object_detection/images に画像をコピーします。
その後、 cd /path/to/dir/models/research/object_detection/images && mv annotations/* ./ && rm -r annotations && mkdir test train を実行します。
動画内で、学習データは200枚以上必要と言っていたので、
頑張ってラベリングしてくださいw
また、画像のサイズは、720x1280 以下にすることが推奨されるようです。
これらが終わったら、適当に jpg と xml のペアを
train, もしくはtest に振り分けていきます。
/path/to/dir/models/research/object_detection/images にて、
import glob, shutil
import numpy as np

xmls = glob.glob('*.xml')
assert len(xmls) > 200

train = np.random.choice(xmls, 200, replace=False)

for xml in xmls:
    name = xml[-4:]
    if xml in train:
        shutil.move(xml, 'train/{}'.format(xml))
        shutil.move('{}.JPG'.format(name), 'train/{}.JPG'.format(name))
    else:
        shutil.move(xml, 'test/{}'.format(xml))
        shutil.move('{}.JPG'.format(name), 'test/{}.JPG'.format(name))
みたいなコードを実行して、適当にディレクトリを振り分けていきます。
上記のコードは、実際に動かしたわけではないので、動作保証はしません。
これで、ラベルの準備は完了です。
fine tuning する対象の重み
今回は、Faster R-CNN をファインチューニングしていこうと思います。
事前に学習された重みは、下記サイトに掲載されているので、
cd /path/to/dir/models/research/object_detection/
wget http://download.tensorflow.org/models/object_detection/faster_rcnn_inception_v2_coco_2018_01_28.tar.gz
tar -zxvf faster_rcnn_inception_v2_coco_2018_01_28.tar.gz
というふうに、ダウンロードして解凍します。
その後、
cp samples/configs/faster_rcnn_inception_v2_pets.config training
cp data/pet_label_map.pbtxt training/label_map.pbtxt
とし、これらの中身を編集していきます。
training/label_map.pbtxt の中には、アイテムのID と名前を書きます。
item {
  id: 1
  name: 'madatsubomi'
}

item {
  id: 2
  name: 'otachi'
}

item {
  id: 3
  name: 'pijotto'
}
faster_rcnn_inception_v2_pets.config は少し修正箇所が多いのですが、
# 10行目
num_classes を自分が学習させたいラベルの数に書き換える
# 107行目
fine_tune_checkpoint を /path/to/dir/models/research/object_detection/faster_rcnn_inception_v2_coco_2018_01_28/model.ckpt に書き換える
# 122 行目
input_path を、 /path/to/dir/models/research/object_detection/train.record に書き換える (未作成)
#124 行目
label_map_path を /path/to/dir/models/research/object_detection/training/label_map.pbtxt に書き換える
#128行目
num_examples を テストデータの数に書き換える
#236行目
input_path を、/path/to/dir/models/research/object_detection/test.record に書き換える (未作成)
#238行目
label_map_path を /path/to/dir/models/research/object_detection/training/label_map.pbtxt に書き換える
これらの操作により、設定は完了です。
TensorFlow が読み出すデータの作成
generate_tfrecord.py というファイルを編集します。
編集するのは、class_text_to_int という関数の中身です。
この関数の中身を、自分のデータセットと training/label_map.pbtxt に書いた内容を見比べながら編集していきます。
def class_text_to_int(row_label):
    if row_label == 'madatsubomi':
        return 1
    elif row_label == 'otachi':
        return 2
    elif row_label == 'pijotto':
        return 3
    else:
        None
その後、train.record, test.record というファイルを作成していきます。
cd /path/to/dir/models/research/object_detection/
python xml_to_csv.py
python generate_tfrecord.py --csv_input=images/train_labels.csv --image_dir=images/train --output_path=train.record
python generate_tfrecord.py --csv_input=images/test_labels.csv --image_dir=images/test --output_path=test.record
これで、TensorFlow が学習時に読み出すデータが作成できました。
学習の実行
学習を実行します。
cd /path/to/dir/models/research/object_detection/
nohup python -u  train.py --logtostderr --train_dir=training \
--pipeline_config_path=training/faster_rcnn_inception_v2_coco.config \
> success.log 2> error.log &
これで、学習が開始されます。
学習の経過を見たい場合は、 tailf error.log を見てみてください。
(なぜ success.log ではなく error.log の方に吐かれるのかは不明)
loss の平均値が 0.05 を下回るようになったら学習完了らしいです。 (動画で言っていた。)
出力
では、出力を確認してみましょう。
出力の確認には、 export_inference_graph.py というファイルを利用します。
python export_inference_graph.py --input_type image_tensor --pipeline_config_path training/faster_rcnn_inception_v2_coco.config \
--trained_checkpoint_prefix training/model.ckpt-X --output_directory inference_graph #ただし X は、 training/model.ckpt-X となっているX の値
その後、 Object_detection_image.py の中の IMAGE_NAME を変更し、
python Object_detection_image.py
を実行します。
そうすると、NN が元画像に box を上書きした画像を出力してくれます。
なにか問題点があったら教えてください。
以上。

